Category Archives: Main Dish

February Friday Dinner

Truffle Mousse on Mini Toasts

For 6 

Ingredients:

  • one package of store-bought mini toasts
  • one package of store-bought All-natural French Truffle Mousse

Recipe:

  1. Spread truffle mousse onto mini toasts
  2. Bon appétit! ;)

Serving suggestions: salad, wine, fruits …

NOTES: What can I say? I sampled the truffle mousse and loved it too much to not to share. Addictive, savory snack!!

Winter Minestrone Soup

For 6

Ingredients:

  • 1 lb Swiss chard, stems trimmed, leaves coarsely chopped
  • 1 russet potato, peeled, cubed
  • 1 onion, chopped
  • 2 carrots, peeled, chopped
  • 2 celery stalks, chopped
  • 3 oz thinly sliced pancetta, coarsely chopped
  • 1 (14 1/2-ounce) can diced tomatoes
  • 1 (15-ounce) can cannellini beans, drained, rinsed
  • 2 (14-ounce) cans low-sodium beef broth
  • 2 tbsp olive oil
  • 2 garlic cloves, minced
  • 1 fresh rosemary sprig
  • 2 tbsp chopped fresh Italian parsley leaves
  • 1 oz piece Parmesan cheese rind
  • salt and pepper

Recipe:

  1. In a heavy large pot, heat the oil over medium heat
  2. Add onion, carrots, celery, pancetta, and garlic. Sauté till the onion is translucent, about 10 minutes
  3. Add Swiss chard, potato and sauté for 2 minutes
  4. Add the tomatoes and rosemary sprig. Simmer until the chard is wilted and the tomatoes break down, about 10 minutes
  5. While waiting, blend 3/4 cup of the cannellini beans with 1/4 cup of the broth in a processor until almost smooth. Add the pureed bean mixture, remaining broth, and Parmesan cheese rind to the vegetable mixture
  6. Simmer until the potato cubes are tender, stirring occasionally, about 15 minutes. Stir in the whole beans and parsley
  7. Simmer until the beans are heated through and the soup is thick, about 2 minutes
  8. Season with salt and pepper to taste. Discard Parmesan rind and rosemary sprig
  9. Bon appétit! ;)

Serving suggestions: all kinds of bread, hearty meat,  …

NOTES: Remember to rinse and drain the beans!! Also to save yourself some $, buy Parmesan cheese and save the rind to make this soup, getting the rind by itself cost me $4 … speechless secret ingredient. Also DO NOT use more or too much more than instructed broth, otherwise soup flavor won’t be as special and intense! Don’t cheapen on the Swiss chard, 1 lb raw Swiss chard might look like a chunky bunch but they will get cooked down to tiny bunch in no time, so delicious in soup!

Pizzas

For 6

Ingredients:

  • Trader Joe’s plain pizza dough
  • Olive Oil
  • Pizza Sauce

Toppings 1:

  • Diced pancetta (maybe 1/5 – 1/4 lb)
  • olive oil
  • 1 smashed garlic clove
  • 1/3 large bunch Russian red kale or dinosaur kale, center rib removed, cut into 2-inch strips
  • 1/2 cups small red seedless grapes, halved
  • 2/3 tbsp thyme leaves
  • 1/3  lb fresh, lightly salted Mozzarella cheese, thinly sliced
  • 1/3 grated pecorino Romano
  • salt to taste

Toppings 2:

  • extra virgin olive oil
  • fresh bay shrimps
  • garlic slivers (thin)
  • truffle salt

Toppings 3:

  • shredded mozzarella
  • fresh basil, torn
  • 1 medium – large heirloom tomato

Toppings 4:

  • 2 tbsp extra virgin olive oil
  • 4 oz shredded mozzarella
  • 1 tbsp minced shallots
  • 1 tbsp fresh oregano, stripped and torn
  • 1 tbsp fresh thyme, stripped
  • 8 oz assorted wild mushrooms, cleaned and cut
  • 3 oz goat cheese
  • more olive oil for garnish

Toppings 5:

  • 3/4 cup pizza sauce
  • red pepper flakes
  • 6-8 oz shredded fontina cheese (may use mozzarella or Monterey Jack)
  • 1/3 cup grated Parmesan
  • 1 mild/hot Italian sausage (sliced or I squeezed out tiny meatballs out of the link)
  • 4 whole eggs
  • olive oil
  • baby arugula

Recipe:

  1. Let the pizza sought sit out for 1 hour before cooking
  2. Preheat oven to 500 degrees
  3. Put the ‘topped’ pizzas into the oven and start checking after 10 minutes.
  4. When ready, take them out, cut and serve
  5. Bon appétit! ;)

Serving suggestions: salad, soup, soda, beer, wine  …

NOTES: Trader Joe’s pizza dough is the way to go! Cheap and yummy! How can you beat the $0.99 deal?! Be creative with the toppings, use seasonal fresh ingredients, just pay a visit to the local farmer’s market, I bet your topping combo imagination will run wild. Remember to either apply abundant sauce or brush on oil if not using cheese, so the pizza won’t turn out dry. But if you watch the cooking time closely, it shouldn’t be a problem. Eggs need to be tended with care but BOY sooooooooo delicious when they come out perfect, slightly runny, um um good! I definitely want to make it for myself again SOON! Most toppings can go straightly to the oven with the dough raw, but if you want to speed up cooking, cook the ingredients half way and then bake with the pizza dough. Fancy cheese totally worth the money and if you are treating yourself, don’t be stingy on spreading the cheese!!!!

Ricotta mousse with honey, pine nuts, orange peel and raisin

For 6

Ingredients:

  • 1 lb whole milk ricotta cheese
  • freshly grated zest from one medium-sized orange
  • pine nuts and raisins to liking
  • honey to taste

Recipe:

  1. In a large bowl combine the ricotta, honey and orange zest. Whip the mixture until thoroughly combined and smooth
  2. Slowly fold the pine nuts and raisins into the cheese mixture until smooth
  3. Cover and refrigerate for a couple of hours before serving
  4. Bon appétit! ;)

Serving suggestions: fruits, dessert wine …

NOTES: When ready to serve, top with some freshly grated orange zest for prettiness.

Leave a comment

Filed under appetizer, Dessert, Main Dish, Soup

January Friday Dinner

Olive Oil Braised Red Onion with Bay Leaves

For 4-6

Ingredients:

  • 1.5 lb red onions (about 3 medium), trimmed, halved vertically, and cut into 2/3-inch wedges
  • 3 dried bay leaves, each torn into 3 pieces
  • 3 tbsp extra-virgin olive oil
  • 1.5 tbsp red wine vinegar
  • 1 tbsp dry white wine
  • salt

Recipe:

  1. Position rack in the center of the oven and heat the oven to 375 degrees
  2. Arrange onion wedges in an half overlapping single layer in a shallow baking dish. Evenly nestle the bay leaves among the onions
  3. Mix the olive oil, vinegar, white wine, and 1.5 tbsp water in a bowl and drizzle over the onions. Then sprinkle over 1 …tsp salt
  4. Cover the baking dish tightly with aluminum foil
  5. Braise the onions in the oven until completely tender, about 45 …minutes. Uncover the dish and continue to braise until all of the liquid has evaporated and the onions are darkly roasted and glossy, about 20… minutes. Remove the bay leaves and serve the onions warm or at room temperature
  6. Bon appétit! ;)

Serving suggestions: salad, bread, grilled steak/pork chop …

NOTES: Fine cooking recommended to chill and toss with arugula, toasted walnuts, and lemon vinaigrette. Or mix with olive-oil packed tuna, capers and a touch of mayonnaise. Or top goat-cheese spreader crostini, which is what I served, I thought it was sophisticated, healthy and delicious! Use to be an onion disliker, but I think it’s starting to grow on me


Creamed Spinach with Bacon Bits

For 4-6

Ingredients:

  • 1 lb fresh spinach, about 2 large bunches
  • 3 strips of bacon, uncooked, finely chopped
  • 1 medium onion, finely chopped
  • 1 cup whole milk
  • 1 clove garlic, finely chopped
  • 2 tbsp butter
  • 2 tbsp flour
  • a pinch of nutmeg
  • salt and pepper to taste

Recipe:

  1. Cut off the thick stems of the cleaned spinach and discard
  2. Blanch the spinach in a pot of boiling water until the spinach is wilted, about 1-2 minutes. Drain and rinse in cold water to stop the spinach from cooking further. Squeeze the spinach to remove all the moisture. Chop the spinach and set aside
  3. Heat a large skillet on medium high. Add the chopped bacon and sauté until the bacon begins to render some of its fat. Add the chopped onion and garlic. Sauté until onions are translucent
  4. Melt butter in a small saucepan on medium low heat until it just starts to bubble. Add the flour and cook, stirring until smooth, about 2 minutes. Slowly add the milk, whisking continuously, cooking until sauce thickens.
  5. Combine spinach, bacon and onion mixture, and the sauce into one pan. Add nutmeg, salt and pepper to taste. Bring to a simmer, remove from heat and serve
  6. Bon appétit! ;)

Serving suggestions: fish, chicken, steak …

NOTES: Bacon can be skipped if you prefer … Yummy source of green!!


Mac ‘n’ Cheese

For 6-8

Ingredients:

  • 1 head of garlic, roasted
  • 1 teaspoon olive oil
  • 1 pound Cavatappi pasta
  • 0.5 lb sliced Applewood smoked bacon
  • 1 ½ cups fresh white bread crumbs (5 slices, crusts removed)
  • ½ cup grated Parmigiano Reggiano cheese
  • 8 tablespoons butter
  • ¼ cup minced shallots
  • ½ cup flour
  • 1 quart whole milk
  • 6 ounces Gruyere cheese, grated
  • 8 ounces extra-sharp Cheddar cheese, grated
  • ½ teaspoon pepper
  • 1 teaspoon salt
  • 1/4 tsp freshly grated nutmeg
Recipe:
  1. Preheat oven to 350 degrees
  2. Slice half inch off the top of the entire head of garlic. Drizzle with olive oil and sprinkle with salt and pepper. Wrap garlic head tightly in foil and roast until tender, about 45 minutes. Remove garlic pulp by squeezing garlic head and smash to form  paste
  3. Cook pasta according to package directions
  4. Cook bacon completely and drain on paper towels. Crumble bacon when cool. Reserve 1 tbsp of bacon fat
  5. Combine breadcrumbs, crumbled bacon, Parmigiano Reggiano cheese, and 2 tbsp of melted butter as topping, set aside
  6. Preheat oven to 375 degrees
  7. Saute shallots over low heat in reserved bacon fat for 1 minute. Add remaining 6 tbsp of butter and continue to sauté shallots in butter and bacon fat until translucent
  8. Add flour and continue to cook for 1-2 minutes. Increase heat to medium. Stirring constantly with a whisk, add milk and the roasted garlic paste
  9. Cook until sauce has thickened (coats the back of a spoon). Remove sauce from heat then add salt, pepper, nutmeg, Gruyere and Cheddar cheeses. Taste and adjust salt and pepper if necessary
  10. Stir in cooked pasta and pour into a baking dish. Sprinkle topping to cover entire top. Cover with foil and bake for 15 minutes. Remove foil and continue baking until sauce is bubbly and topping is browned
  11. Bon appétit! ;)

Serving suggestions: salad, soup, southern dishes  …

NOTES: Hearty and cheesy, makes great left over meal too!! Grating all those cheese was such a pain, I wanted to quit then. If possible, store-bought grated cheese would do. As with all pasta dishes, al dente is the key. Maybe it’s because I didn’t grow up eating mac ‘n’ cheese like many American kids, I lack the emotional/childhood attachment to it, although it was comforting and delicious, way too much work to my liking …


Balsamic Strawberries with Ricotta & Mascarpone Mousse 

For 8

Ingredients:

  • 1 cup heavy cream
  • 1 lb whole milk ricotta cheese
  • 8 oz mascarpone cheese
  • 3/4 cup granulated sugar
  • freshly grated zest of one lemon
  • 2 lbs strawberries, hulled and cut into quarters
  • 1/4 cup balsamic vinegar, or to taste

Recipe:

  1. Beat the cream until soft peaks form
  2. In a large bowl combine the ricotta, mascarpone, 1/2 cup  sugar, and lemon zest. Whip the mixture until thoroughly combined and smooth
  3. Slowly fold the whipped cream into the cheese mixture until smooth. Cover and refrigerate for a couple of hours
  4. Half an hour before serving, gently mix the remaining sugar and balsamic vinegar into a bowl with the quartered strawberries
  5. When ready to serve, fill a clear cup halfway with the strawberries and spoon over the ricotta-mascarpone mousse
  6. Bon appétit! ;)

Serving suggestions: berries, scones, biscuits, pancakes, crepes …

NOTES: Depending on the grade of the balsamic vinegar you have on hand, you should really taste!!! I imagine it’d be more wonderful with super aged, thick balsamic. I think mine came out a little sour because I didn’t taste and poured in too much 😛 Also, don’t let the strawberries sit in the vinegar for longer than half an hour because you wouldn’t want acidity cooked berries! Nevertheless, I loved it and the sweet cheese mousse was super good. Left over was consumed with such joy and passion the following days. Definitely would make this again!!! It would be a sweet ending to any Italian meal or summer time. 

Leave a comment

Filed under appetizer, Dessert, Main Dish, Side Dish, Vegetable

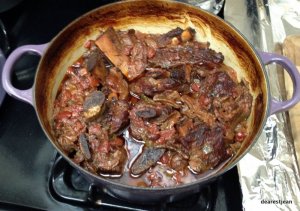
Short Rib Ragù

For 4-6

Ingredients:

  • 3 lbs bone-in short ribs
  • 1/2 large onion, diced
  • 1 large carrot, sliced
  • 1 stalk of celery, sliced
  • 1/2 oz dried porcini mushrooms
  • 1 large clove garlic, minced
  • 1 cup fire-roasted diced tomatoes with juice
  • 1 tbsp tomato paste
  • 1/2 tbsp anchovy paste
  • 1/2 tbsp Dijon mustard
  • 1-2 qt low-sodium chicken broth
  • 1 cup good, full-bodied red wine
  • 1/2 tbsp olive oil
  • 1-2 dashes of Worcestershire sauce
  • 1 tbsp chopped fresh rosemary
  • 1/2 tsp dried thyme
  • 1/2 tsp dried oregano
  • 1 bay leaf
  • chopped fresh parsley for garnish

Recipe:

  1. Preheat the oven to 350 degrees
  2. In a bowl, rehydrate the porcini mushrooms with 1 cup of warm water
  3. Heat the olive oil in a large, heavy pot over medium heat. Cook the short ribs for about 2 minutes per side, until all sides are browned. Remove from the pot and set aside on a plate
  4. Leave 1 tbsp of fat in the pot and add in onions, carrot and celery. Cook, stir occasionally, until softened, about 5 minutes. Stir in the garlic to cook for 1 more minute. Add the tomato and anchovy paste. Stir to coat all the vegetables thoroughly
  5. Add the tomatoes, wine, mustard, Worcestershire sauce, herbs along with the porcini mushrooms and their soaking liquid (top 75% only as the bottom contains grit from the mushrooms). Stir to combine
  6. Add the ribs back into the pot and pour in enough chicken broth to cover the ribs. Bring the mixture to a boil, cover the pot then transfer it to the oven. Cook for 3 hours, or until the meat is very tender and falling off the bones.
  7. Remove from the oven and transfer the meat to a cutting board to cool slightly. Skim off as much fat as possible from the mixture that remains in the pot and puree the mixture in a blender or food processor until sauce becomes mostly smooth
  8. When the meat is cool enough to handle, pull all the meat off the bones and shred it into bite-sized pieces
  9. Transfer the meat to a serving platter and coat with the sauce.
  10. Bon appétit! ;)

Serving suggestions: salad, mashed potatoes, egg noodles, polenta, rice, bread, red wine,  …

NOTES: Excusez moi for the crappy photo, this dish is definitely a keeper. It’s meat falls-off-the-bone tender and taste even better the second day!! 🙂 Perfect for warming and filling up your stomach in the wintry months! Note that this recipe doesn’t call for salt or pepper because anchovy paste, mustard, chicken broth and Worcestershire sauce sufficiently round up the flavors and it’s definitely got a more aromatic than heavy taste. If you crave a bit of the saltiness in dishes, feel free to add salt and pepper to your liking!

Leave a comment

Filed under Main Dish

Salmon with Wine Glaze

For 4

Ingredients:

  • 1 lb (4 pieces salmon fillets/steaks)
  • 1/3 cup Pinot Noir
  • 2 tbsp soy sauce
  • 1 1/2 tbsp pure dark maple syrup
  • 1 1/2 tbsp Japanese sesame oil
  • one 1-inch piece of fresh ginger, peeled, sliced and finely grated
  • 1 clove of garlic, finely minced
  • olive oil/sesame oil for cooking
  • toasted white and black sesame seeds
  • salt and pepper

Recipe:

  1. Coat one side of the salmon with salt and pepper and spread a layer of toasted sesame seeds on top
  2. Add some oil in a hot skillet, cook salmon with the coated side facing down first, about 3 minutes. Repeat step 1 for the remaining side of the salmon, carefully flip over and cooking for another 3 minutes
  3. In a bowl, mix well the wine, soy sauce, maple syrup, and 1 1/2 tbsp sesame oil, then add in garlic and ginger. Heat the sauce in a sauce pan for 5 – 7 minutes till it reaches a thicker consistency. Drizzle over plated salmon
  4. Bon appétit! ;)

Serving suggestions: Pinot Noir, vegetables, rice …

NOTES: Cooking time of the fish depends on the thickness of the salmon fillet/steak. Watch carefully, it’s ready when the meat turns white-ish and the sideview of the middle section is just slightly pink. Don’t move the fish around much otherwise you will lose the sesame crust. If you are short on sesame oil, olive oil works as well for cooking the fish, but definitely use good quality sesame oil for the glaze. All I can say is that it’d be such a torture to ever eat BAD (dry, flaky, flavorless) salmon again after making this dish. It’s so easy to make as long as you get good ingredients. Treat yourself right, use fresh salmon fish. 😉

2 Comments

Filed under Main Dish, Seafood

Braised Pork with Fennels

For 6-8

Ingredients:

  • 2 – 2 1/2 lb boneless pork shoulder/butt (tied)
  • 3 cloves of garlic, cut into slivers
  • 3 tbsp olive oil
  • 1 big leek stalk, cut in half lengthwise, thinly sliced
  • 1/2 cup diced carrots
  • 1 fat fennel with fronds
  • 1 cup hard cider
  • 1 cup chicken broth
  • 2 tsp fennel seeds, toasted
  • 1 bay leave
  • 1 tbsp fleur de sel
  • salt and cracked black pepper

Recipe:

  1. Cut small slits evenly all over the surface of the pork, insert a sliver of garlic into each slit  (1/4″ deep slit about 1″ apart), rub in salt and cracked black pepper
  2. Heat 1 1/2 tbsp oil in a large enameled iron pan, brown the pork well over medium heat, about 10 mins on all sides. Take it out and place it somewhere else to keep warm
  3. Preheat oven to 325 F
  4. Add 1/2 tbsp oil to the same pan and sautee the carrots and leeks till tender, about 3 mins. Pour in hard cider to bring to a boil. Lower the heat to a high simmer and cook till the cider is reduced to 1/2 cup
  5. Bring pork back into the pan, pour the chicken broth over the meat. Stir to combine with the vegetable and cook till the liquid comes to a boil
  6. Turn off heat, add in the bay leaf and transfer the covered pot into oven, cook pork till melting tender, 1 1/2 – 1 3/4 hrs
  7. In the mean time, chop about 1 tbsp fennel fronds for garnish. Cut the fennel bulb lengthwise into 1/2 inch slices. Heat the remaining oil in a skillet and cook the fennel slices till browned on both sides
  8. Add the browned fennel slices to the braising pork during the last 20 mins of cooking
  9. Remove pot from the oven and carefully lift the fennel slices onto a serving platter
  10. Transfer the pork to a cutting board, let it rest and cool a bit
  11. Skim off fat from the sauce, and reduce the sauce to 1/2 cup, strain
  12. Slice the meat and arrange on a platter with the fennel, spoon sauce over and sprinkle with chopped fennel fronds
  13. Combine toasted fennel seeds and fleur de sel in a small serving bowl/dish, offer to be passed with the braised pork. Sprinkle a pinch if desired
  14. Bon appétit! ;)

Serving suggestions: WINE!!!!!!!

NOTES: VERY VERY tasty!!!!! 😀 The fennel seeds & salt combination is a must, it adds another layer of unique flavor to the already flavorful, super tender pork, just remember not to over salt-rub the pork shoulder/butt to begin with. Toasting fennel seeds simply means heating up a small, un-greased pan, put the seeds in,  briskly move the pan back and forth and stop when the seeds become fragrant and slightly dark brown.

2 Comments

Filed under Main Dish

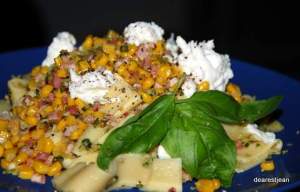
Pasta with Pancetta and Corn

For 2-4

Ingredients:

  • 1/2 pound dried or fresh wide pasta
  • 1/2 cup panko (Japanese bread crumbs)
  • 1/2 cup fresh basil leaves, plus some to garnish
  • 1 teaspoon sea salt
  • 3 tbsp olive oil
  • 1/4 pound pancetta
  • 1/2 can of corn, drained or 2 ears of corn
  • 4 dried red chilies, finely chopped or red chili flakes
  • 1/2 cup shredded Parmigiana Reggiano
  • 1/4 pound burrata

Recipe:

  1. Cook pasta in 3-4 quarts of boiling salted water until al dente (firm but not hard), stirring often. Drain (Follow instruction on package)
  2. For the breadcrumbs, place the panko, basil, and salt in a food processor and grind until small. Drizzle with 1 tablespoon of olive oil and pulse until thoroughly mixed
  3. In a non-stick skillet, toast the breadcrumbs till slightly browned and dry, set aside
  4. For the sauce, heat up a large skillet and add 2 tablespoons of olive oil. Cook the pancetta until slightly caramelized, roughly 2 minutes. Add corn and chilies, cook for 5-7 minutes on medium heat, stir a little
  5. Turn off the heat and add pasta and cheese to the skillet. Combine well using tongs. Top with a generous dusting of breadcrumbs and several hunks of the burrata cheese
  6. Season with salt and pepper to taste. Garnish with basil leaves
  7. Bon appétit! ;)

Serving suggestions: wine, salad, melon  …

NOTES: I used pappardelle from Trader Joe’s which was exactly 1/2 lb, this recipe was designed for 2, but the size is truly generous, I think with a small salad, it’s plentiful for 3. With bread and other sides, it would be good for 4. Notice how much corn I had in the plate! Yes, I used one whole can of corn which is equivalent to 3-4 ears of corn. I love corn and also without a salad, I thought I’d gain some fiber from there 😉 The combination of corn, pancetta, red chilies, basil-infused panko and burrata is quite amazing, each mouthful is decisively exciting. Try it! 🙂

Leave a comment

Filed under Main Dish

Eggplant Linguine

For 4

Ingredients:

  • 1 lb linguine
  • 1 large or 3 small eggplants
  • 2 – 3 medium-sized tomatoes, chopped
  • 2 dried chilies
  • 4 cloves of garlic
  • 1/2 – 1 cup olive oil
  • sea salt and freshly grounded black pepper
  • thinly sliced sweet basil leaves
  • 10 shrimp (optional)

Recipe:

  1. Slice eggplants to about 1/2 inch thick, cook them in abundant olive oil on low heat till browned and soft on both sides. Sprinkle a little sea salt while cooking and add more oil as necessary. When finished, leave them in a plate to cool
  2. Boil 4 quarts of water in a large pot, salt it when it reach rolling boil (about 4 tsp of salt for 4 quarts of water). Add in the linguine, stir a little and wait for it to reach another rolling boil, cook for additional ~ 7 minutes from there on. Add 1 cup cold water to stop the cooking process and pour into a colander to carefully drain the pasta
  3. In a lightly oiled pan, add in dried chilies and smashed garlic, cook the smashed garlic until brown then discard
  4. Add chopped tomatoes and a little salt, stir occasionally, cook until it becomes sauce-like but not dry, add in slightly cooled pasta
  5. Cut the cooled eggplants into narrow strips, bring them into the saucepan with tomatoes and pasta, add salt, freshly grinded black pepper  and basil, (shrimp, too, prepared separately) toss well
  6. Bon appétit! ;)

Serving suggestions: white wine, bread, salad …


NOTES: READ manufacturer’s instruction on how to cook the pasta, time might vary. I don’t know if it was the Trader Joe’s linguine, or I followed instruction this time :P, but the linguine came out just perfect, with the right amount of chewiness. Be extra careful when cooking the eggplant in hot oil, I burned one of my fingertips… 😦 If you decide to add some shrimps, stir fry them  separately with some garlic and sea salt, then mix them with the pasta at the very end. Watch out for the color of the shrimp, when it loses its transparency, turn off the heat right away, it will continue to cook a little longer in the pan, you do not want your shrimps to be overdone. It was a very good meal …. 🙂 O and yeah… I forgot to add basil leaves… after going through the trouble of getting a basil plant, next time!!!!

Leave a comment

Filed under Main Dish

Thai Basil Clams

For 2-3

Ingredients:

  • 1.5 lb live Manila Clams
  • 1 tbsp canola oil
  • 1 small bunch of Thai Basil
  • 3 cloves of garlic
  • 4 Thai chilies (thinly sliced)
  • 2.5 tsp fish sauce
  • 1/2 tsp sugar
  • 3/4 tbsp nam prig pow (optional)

Clean the clams:

  1. Select undamaged clams that are unopened, keep them in a cool place, unwrapped, so they can breathe
  2. Right before cooking, soak the clams in rice water or water with added salt or water with added cornmeal for 30 minutes to 1 hour
  3. Take the clams out and thoroughly scrub the shells of the clam
  4. Rinse lightly underneath the running water

Recipe:

  1. Heat up the oil in a wok on high, add in thin strips of Thai peppers and smashed or coarsely chopped garlic
  2. Add cleaned clams in right away and stir until all clams are opened
  3. Add in fish sauce, sugar and nam prig pow (if available), mix them well with the clams
  4. Add Thai basil leaves, stir quickly and remove from heat
  5. Bon appétit! ;)

Serving suggestions: rice, spirits, buns …

NOTES: I didn’t find nam prig pow at 99 Ranch, but perhaps it was just under the name “roasted chili paste”… and I was single-mindedly looking for “nam prig pow” only… It was nevertheless very delicious!! I should have bought at least 2 lb of the clams… The Thai chilies were pretty powerful, my lips are still ‘hot’ because of them, and I only used four small ones!! Don’t stir the clams for too long after adding the Thai basil leaves, and eat  them while they are hot…. :), so good!!

3 Comments

Filed under appetizer, Chinese, Main Dish, Seafood, Side Dish

Miso Cod with Spinach Banchan

For 3-4

Ingredients:

Miso Cod

  • 1 lb Black Cod fillets (3-4 pieces)
  • 1/4 cup sake
  • 1/4 cup mirin
  • 4 tbsp miso paste
  • 3 tbsp honey

Recipe:

  1. Make marinade inside a glass container using all ingredients but the fish
  2. Pat the fish fillets dry and put them inside the marinade container, refrigerate for 24 hr
  3. Preheat oven to 400F
  4. Lightly Grill fish fillets till brown on both sides
  5. Bake for ~ 15 mins
  6. Bon appétit! ;)

Spinach Banchan

  • 1 bunch spinach
  • 3 cups of water
  • 1 tsp salt
  • 1/2 tsp sesame oil
  • 1/2 tsp toasted white sesame
  • 1 clove of garlic, finely chopped
  • a pinch of salt

Recipe:

  1. Boil the water with 1tsp salt
  2. When it starts to boil, put the clean spinach in there immediately and turn off the heat, let it sauna for 2-3 mins
  3. Take the spinach out, drain water and wash under cold water for about 1-2 mins, gently squeeze out the excess water
  4. Chop the spinach a few times and put it in a mixing bowl
  5. Mix with sesame oil, sesame seed, finely chopped garlic and a pinch of salt to taste
  6. Bon appétit! ;)

Serving suggestions:  bread, rice, sake …

NOTES: Very easy to make and very taste-buds pleasing! 😀 Can be pricey if you choose to get quality black cod, but you may use regular cod fillets. White miso paste was recommended, but I only had the dark one at home, so that was used instead. Additionally, I chose honey over sugar, so feel free to use sugar if honey is not available at hand. Baking time depends on the thickness of the fish fillets, thus, it can range from 10 to 15 mins. Also, remember to remove dead leaves and roots before making the spinach side dish, it’s important to toast the sesame and pay attention to how much salt you add in there. Finely chopped scallions can also be added … ENJOY!!

2 Comments

Filed under Main Dish, Seafood, Side Dish, Vegetable

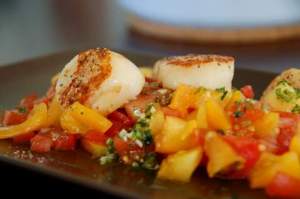
Seared Scallops with Heirloom Tomatoes

For 2-4

Ingredients:

  • 8 scallops
  • 1 lb heirloom tomatoes (3-4 medium sized ones)
  • 1/5 cup olive oil
  • 2 garlic cloves, minced
  • 4 tbsp fresh, finely chopped tarragon
  • 3 tbsp brown butter
  • canola oil to sear scallops
  • salt & black pepper to taste

Recipe:

Make brown butter

  1. Use a non-dark interior/bottom pan and heat butter on medium till the butter is completely melted into liquid and turn slightly brown
  2. Be careful not to overheat and strain out the specks when ready

Main part

  1. Mix olive oil, tarragon and garlic in a small bowl
  2. Sprinkle both sides of scallops with sea salt, sear scallops for about 2 minutes on each side over medium-high heat in a lightly oiled pan, till golden crust form
  3. Dice tomatoes to desired chunks, place on serving plate and drizzle with the olive oil mixture and some salt
  4. Place scallops on the bed of tomatoes, drizzle with brown butter and some black pepper
  5. Bon appétit! ;)

Serving suggestions: white wine, bread, pasta, rice pilaf …

NOTES: Did you know that scallop come in dry and wet!? Well, I didn’t. But you’d better make sure you start with dry scallop or if only wet scallop is available in your neighborhood, rinse the scallops REALLY well and pat them dry!! Apparently most scallops we see in markets are wet scallops that had been soaked in phosphates, which acts as a preservative and also makes the scallop white and plump. If you don’t take care of the chemical and start searing.. well… you’d be poisoning yourself. Since the dry scallops are all natural, they’d be sweeter and vanilla colored. 🙂 Um… time to run to Whole Foods or local specialty seafood market and indulge? Don’t sear the scallops for too long, unless you like them rubbery and bouncy 😀 You can make a lot of the brown butter at once, they will last max 6 months refrigerated and they are very seafood and salad friendly! 😉

Leave a comment

Filed under Main Dish, salad, Seafood